Remove
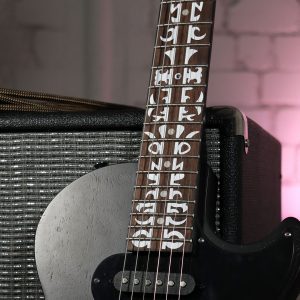
Removing fretlook inlay stickers is just as easy as attaching them. So that you can remove the removable stickers without leaving any residue, we recommend that you loosen the strings on your guitar for removal or remove them if they are ready for a change anyway. Depending on how long the inlay stickers have been on your fingerboard, you can attach new ones directly or clean them beforehand. First of all, we’ll show you the best way to remove our stickers.
Removing fretlook inlay stickers is just as easy as attaching them. So that you can remove the removable stickers without leaving any residue, we recommend that you loosen the strings on your guitar for removal or remove them if they are ready for a change anyway. Depending on how long the inlay stickers have been on your fingerboard, you can attach new ones directly or clean them beforehand. First of all, we’ll show you the best way to remove our stickers.
What you need to remove
No special tools are required for removal. However, the following utensils can be helpful:
- A string winder (if available)
- A long thread (approx. 30 cm)
- A medium-strength pick
- A microfiber cloth
What you need to remove
No special tools are required for removal. However, the following utensils can be helpful:
- A string winder (if available)
- A long thread (approx. 30 cm)
- A medium-strength pick
- A microfiber cloth
Step 1: Preparation
- Place the guitar on a flat and padded surface
- Support the guitar neck if necessary
- Tip: Take the thread and tie a loop in one end. You can use the thread to tie back your strings.
Step 1: Preparation
- Place the guitar on a flat and padded surface
- Support the guitar neck if necessary
- Tip: Take the thread and tie a loop in one end. You can use the thread to tie back your strings.
Step 2: Tie back or remove the strings
- Loosen the tension of the strings – by hand or, if necessary, with a string crank – until you can pull them right and left over the edge of the fingerboard
- Take the thread and bring the end with the loop from the side under the thick E, A and D strings
- Then bring the other end of the thread under the thin E, B (B) and G strings
- Now pull both ends of the thread down and feed the open end through the end with the loop, pull the thread under the guitar neck and tie it to the button for the guitar strap
- Alternatively: If you want to change the strings of your guitar in the same breath, you can remove them as normal.
Step 3: Remove the inlay sticker
- Take the pick and carefully peel off the inlay sticker on the first fret
- Tip: Always start at a corner or the thinnest part of the sticker
- After you have removed one area with the help of the pick, you can peel off the entire sticker
- Depending on the duration of use, minimal adhesive residue may stick to the fingerboard, which you can simply wipe away with your finger
- Remove all other inlay stickers in the same way
- Once all of the stickers have been removed, wipe the entire fingerboard with the microfiber cloth
You have successfully removed your fretlook inlay sticker!
If your guitar is already clean after removing it, you can attach new fretlook inlay stickers straight away. If your guitar has seen better days, we recommend cleaning it before you apply new stickers.
Video tutorial
The instructions for removing your fretlook inlay sticker and much more can also be found as a video on our YouTube channel. Don’t forget to subscribe!
Video tutorial
The instructions for removing your fretlook inlay sticker and much more can also be found as a video on our YouTube channel. Don’t forget to subscribe!
Time for something new?
-

Stripes
$17.85 * Select options -

Scratches
$17.85 * Select options -

Insane
$23.80 * Select options -
Vine
$23.80 * Select options -

Oaktree
$17.85 * Select options
Time for something new?
-
Stripes
$17.85 * Select options -
Scratches
$17.85 * Select options -
Insane
$23.80 * Select options -
Vine
$23.80 * Select options -
Oaktree
$17.85 * Select options
Do you have any questions?
Visit our helpcenter